Layer Blending Modes Demystified
/
Many digital artists get confused with regard to Blending modes (Compositing Methods in Painter). Multiply? Screen? Overlay? What do these layer types do and what are they good for? I'm not going to go into great detail, but I am going to unlock a key piece of the Blends Puzzle for you.
A Blending mode applies a layer's pixels—using a formula designed to produce a particular result—to any underlying pixels it finds beneath the layer. To demonstrate how Blending modes produce different results based on a formula, I'm going to use a White-to-Black gradient on a layer and change its Blending mode, then observe the differences.
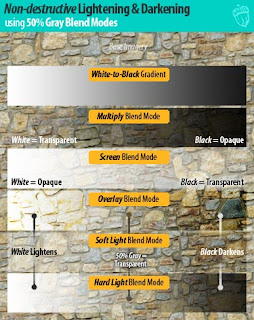
When the gradient layer's Blending mode is set to Normal (Default in Painter), the gradient is opaque. The Multiply mode treats White as transparent and Black as opaque. The Screen mode is just the opposite; Black is transparent and White is opaque. In each case, the opaque color graduates to transparency.

Click on image to view full size.
The next three Blending modes are different; Overlay, Soft Light, and Hard Light treat 50% Gray as transparent. At the ends of the gradient layer, underlying pixels are lightened (White) or darkened (Black). The grayscale in-between Black and White graduates to full transparency, which is the 50% Gray value in the middle of the gradient. Essentially, these Blending modes combine the earlier described Multiply and Screen modes. Lighter-than-50% Gray shades are Screened, Darker-than-50% Gray shades are Multiplied.
What makes these three Blending modes visually different from each other is the manner in which each formula is written. Overlay saturates underlying color, as well as lighten and darken. Soft Light is subtle—it lightens and darkens without saturating. Hard Light is visually the truest to Multiply and Screen—Black and White are totally opaque.

Click on image to view full size.
This is all interesting, but how can it be put to practical use? The answer lies in Non-destructive tonal editing techniques. A 50% Gray-filled layer set to one of the Overlay/Soft Light/Hard Light modes is transparent. It is invisible until lighter or darker tonalities are applied. This layer/Blending mode arrangement makes an excellent non-destructive dodging and burning layer. By using an airbrush and toggling between Black and White, an underlying image can be locally tonal adjusted (e.g., highlights and shadows).
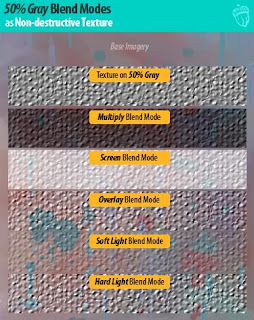
Another novel use of a 50% Gray layer is as a non-destructive texture. A texture applied to 50% Gray has highlight and shadow detail in it. The shades towards 50% Gray will allow the underlying imagery to show through unaffected. The lighter and darker tonalities associated with the highlights and shadows will appropriately affect the underlying image, resulting in a convincing addition of texture.
Because these techniques are layer-based, the Opacity of the layer can be adjusted to control the emphasis of the tonal adjustments. Best of all, the base artwork is not permanently altered.
A Blending mode applies a layer's pixels—using a formula designed to produce a particular result—to any underlying pixels it finds beneath the layer. To demonstrate how Blending modes produce different results based on a formula, I'm going to use a White-to-Black gradient on a layer and change its Blending mode, then observe the differences.
When the gradient layer's Blending mode is set to Normal (Default in Painter), the gradient is opaque. The Multiply mode treats White as transparent and Black as opaque. The Screen mode is just the opposite; Black is transparent and White is opaque. In each case, the opaque color graduates to transparency.

The next three Blending modes are different; Overlay, Soft Light, and Hard Light treat 50% Gray as transparent. At the ends of the gradient layer, underlying pixels are lightened (White) or darkened (Black). The grayscale in-between Black and White graduates to full transparency, which is the 50% Gray value in the middle of the gradient. Essentially, these Blending modes combine the earlier described Multiply and Screen modes. Lighter-than-50% Gray shades are Screened, Darker-than-50% Gray shades are Multiplied.
What makes these three Blending modes visually different from each other is the manner in which each formula is written. Overlay saturates underlying color, as well as lighten and darken. Soft Light is subtle—it lightens and darkens without saturating. Hard Light is visually the truest to Multiply and Screen—Black and White are totally opaque.

This is all interesting, but how can it be put to practical use? The answer lies in Non-destructive tonal editing techniques. A 50% Gray-filled layer set to one of the Overlay/Soft Light/Hard Light modes is transparent. It is invisible until lighter or darker tonalities are applied. This layer/Blending mode arrangement makes an excellent non-destructive dodging and burning layer. By using an airbrush and toggling between Black and White, an underlying image can be locally tonal adjusted (e.g., highlights and shadows).
Another novel use of a 50% Gray layer is as a non-destructive texture. A texture applied to 50% Gray has highlight and shadow detail in it. The shades towards 50% Gray will allow the underlying imagery to show through unaffected. The lighter and darker tonalities associated with the highlights and shadows will appropriately affect the underlying image, resulting in a convincing addition of texture.
Because these techniques are layer-based, the Opacity of the layer can be adjusted to control the emphasis of the tonal adjustments. Best of all, the base artwork is not permanently altered.

